Olive-Rosemary Bread

Bonjour bonjour!
Good Friday to you all.
I have a recipe to pass on to you this afternoon, it’s delectable.  This bread will make your socks fly off your feet and your eyelashes curl into perfect ringlets.

To boot, it’s gluten-free, though the glutivores (not a real word) out there will also enjoy it very much.  Just ask the guests I had at my dinner party last night.  They couldn’t believe this bread was gluten-free when I served it alongside a hearty elk stew and a heart warming malbec wine.
They’ll testify.

I should add that I found this recipe in THIS cookbook which contains a fantastic selection of recipes that feature almond flour, agave nectar and grapeseed oil instead of regular wheat flours, sugar and vegetable oils.  Baking and cooking with almond flour is the most scrumptious way to eat gluten free, in my opinion, and probably the most expensive (GROANnNNnnn).  If you haven’t come in contact with this cook book yet and you are living gluten-free, I’d highly suggest picking up a copy.  Tout de suite!
 Ingredients:  
3/4 cup creamy almond butter at room temperature
2 tbsp olive oil
3 large eggs (Winona and Rhonda supplied mine…)
1 tbsp agave nectar
1/4 blanched almond flour
1/4 cup arrowroot powder
1/2 tsp sea salt (I use Celtic sea salt, because it’s the best…)
1/2 tsp baking soda
1/4 cup kalamata olives, pitted and finely chopped
1 tbsp finely chopped fresh rosemary
 Directions:
Preheat the oven to 350F, Grease a 7×3 inch loaf pan with grapeseed oil (or olive oil…I’m aware that not everyone uses grapeseed oil) and dust with almond flour.

In a large bowl, mix together almond butter and olive oil until smooth.  Then blend in the eggs and agave nectar.  In another bowl, combine your dry ingredients and then blend these with the wet ingredients until thoroughly combined.  Fold in the olives and rosemary and pour the batter into your loaf pan.

Bake for 45-55 minutes, on the bottom rack of the oven, until a knife inserted in the center of the loaf comes out clean.  Let the bread cool in the pan for one full hour and then serve.
I could obviously eat an entire loaf myself except RW has demanded that I share with him.  Since he has built me a brand new bathroom I suppose I shall acquiesce to his demands.

This bread really saved me this week.  I’ve been spending my afternoons stomping around the house complaining bitterly about how my body is craving grains and I just wish I could sink the hearts of my teeth into a beautiful slice of wheat bread, freshly baked, slathered in the magenta delicatessa that is plum jam.  Sometimes we gluten-free folks experience times like this, times when nothing fills the void.

I hope your weekends are full of delicious foods, long walks, organic carrots and good books. If you can manage glutens, please raise a gloriously golden croissant in my name before you let its buttery fibers dissolve on your tongue tip.

Happy baking my friends!
Happy weekending my friends.
Be well.
xx
Plume

Post Scriptus:
Plum says, “Hi!  Gimmie all your biscuits or I’ll twang your heartstrings!

…she’s been helping RW paint our new bathroom doors.  As you can see.

All Is Not Lost

Today I’m here to inform you of the fact that if you have been forced into the confines of a gluten free diet in this lifetime, you can still have waffles!
 [sorghum waffles wearing maple berry smooch syrup with sides of elk breakfast sausage and nectarine slices]

How To:
2 eggs (separated)
1/4 cup canola oil (or whatever oil you prefer)
2 tbsp sugar
1 tsp salt
1 3/4 cup milk
1 3/4 cup sorghum cornstarch mix (2/3 + 1/2 cup sorghum flour AND 1/3 + 1/4 cup cornstarch premix this in a separate bowl and then measure out the amount needed for this recipe…sorry to confustigate you…if you find yourself feeling confustigated…which isn’t a real word by the way)
4 tsp baking powder
1 3/4 tsp xanthan gum

Beat egg yolks, stirk in milk and oil.  Add flour, sugar, baking power and salt.  Stir until all lumps are gone.  Beat egg whites until stiff and gently fold into batter.  Pour into your waffle iron, cook and eat.

Just to set the record straight, RW is the Waffle King and makes fresh waffles from scratch most days of the week.  Yes.  I agree.  He is a magical fluffy baby centaur man!

Now, if you’re in the tropics, you won’t comprehend what I’m talking about when I make this next statement but let me tell you, waffles were the perfect thing for breakfast today as it’s been snowing nonstop and a winter wonderland always seems cozier when there are waffles on the kitchen table!  What’s your favorite cold weather breakfast?

I hope it’s lovely where you are!
I’ll be back in a while with a post all about my recent time away!
Stay tuned.
xx
Plume

PS  The maple berry smooch syrup came to me by way of a friend who resides in my home town in Canada.  It’s made of maple syrup and Saskatoon Berries (also known as Service Berries)  My dear friend Michele is ALSO the gal who won the golden ticket giveaway!  She’s an amazingly generous woman and actually gave the necklace to her best friend who lives in Tucson.  Can you believe it?  Thanks for the Saskatoon sauce, Ms Michele, it made us smack our lips like a pack of wild things.

The Pumpkin Soup Your Mother Warned You About

Well, as I wrote about here, we harvested a  bounty of beautiful pumpkins from the gardens here at The Gables.  I’ve been pondering on what the heck to do with them — many of you offered helpful suggestions — and yesterday I decided I needed to attempt a pumpkin soup.

As stated before, I had some rather awful experiences with pumpkin soups whilst living in New Zealand a few years ago.  So, with that expressed, fully,  I pulled two small pumpkins from the pumpkin pile yesterday and whipped up the deliciosity (not a real word) that is this soup.

I used the ingredients listed in this recipe for cream of pumpkin soup, however, since I roasted and pureed the pulp of my own, home grown pumpkins, I didn’t have an exact pumpkin amount so I really winged the ingredient ratios as I went along — testing by taste to make sure I was on the right track.  The result truly was scrumptious, earthy, sweet and spicy.
Cream of Pumpkin Soup Ingredients:
1 cup chopped onion
2 tbsp butter
2 cans chicken broth
1 can (15oz) pumpkin puree
1tsp salt
1/4 tsp ground cinnamon
1/8 tsp ground ginger
1/8 tsp ground black pepper
1 cup heavy whipping cream

Directions:
Toss some butter in your sauce pan and saute your chopped onion until it’s relatively soft.  Add chicken broth and pumpkin puree to onions, bring to a boil, cover, reduce the heat and simmer for 15 minutes.  

Transfer broth mixture to a blender and puree until smooth.

Return mixture to saucepan and add all spices.  Bring to a boil, reduce heat and simmer for 10 minutes.  

Stir in heavy whipping cream and fully heat again (but do not boil) to the temperature you’d like to serve it at.

*As usual, I would greatly encourage you to find a beautiful, organically grown, vine ripened pumpkin at your local market to roast and puree yourself.  I’m not sure how this soup will taste if you use the sad little pumpkin bits that come spiritless and corralled in a tin can…

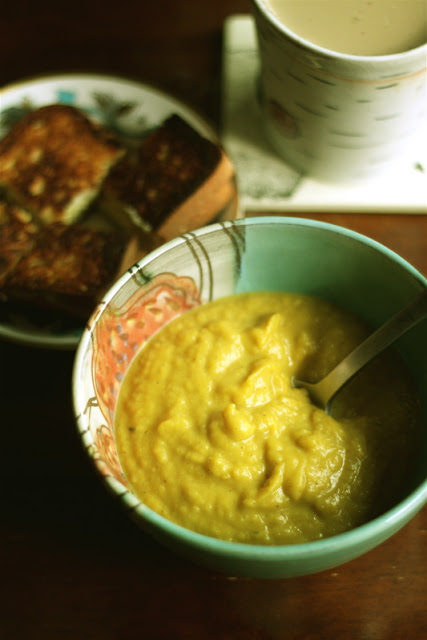
I served this soup to my smokejumpers with a side of spinach salad last night.  This afternoon, while they were out bird hunting, I consumed the leftovers with a small grilled cheese sandwich and a soy latte — so autumnal.  I have been converted into a pumpkin soup passionista.  Officially.  Watch out!  You will be too.

Happy souping.
xx

Orange Juice & Olive Oil


It is Friday and it is time to sit back with a cup of tea and peck away at something lovely but not too sweet.  I have just the thing for you.  It’s made of orange juice and olive oil.

Ingredients:
4 eggs – separated
1tsp vanilla
3/4 cup white sugar
1/2 cup brown sugar
3/4 cup olive oil
3-3 1/2 cups flour
1 heaping tsp baking powder
zest (I LOVE THAT WORD) of one orange 
1 cup of orange juice (about 4 oranges)
1/2 pine nuts (though I’ve been informed that pecans work as well)

Directions:
1.  Heat your oven to 350 horsepower (or degrees F).
2.  Whip up those egg whites until they’re positively thick and lush (like the eyelashes you’ve always wanted).  Pop them in the fridge.
3.  In another bowl, whip yolks together with vanilla until they are delightfully foamy.  Add both sugars and the olive oil and stir it up.  Thoroughly.
4.  Grab a spoon and mix in the flour, baking powder and orange zest and the orange juice you took the time to squeeze with your sweet little hands.  Stir until everything is smooth and then gently fold in the egg whites.  
5.  Divide the batter between two cake pans and sprinkle the nuts of your choice on top.

Bake for roughly 35 minutes or until the cakes pass the toothpick test.  And as a friend told me, you should try to not eat it all in one sitting.

:::Jillian Edits:::
My batter seemed a bit too thick so I actually added another 1/3 cup of orange juice to the mix.  When serving, I decided to apply a light dusting of icing sugar just to add a bit of glitz to my overall presentation.

I quite enjoy this cake.  It’s not too sweet and it’s rather perfect for nibbling with a cup of coffee or tea as the overall flavor could be considered delicate and light.  Break out the doilies and your best china tea pot.  Call up a gaggle of girlfriends and share orange juice olive oil cake while you do some hardcore cross stitching.

xx